Lighting the Map
In our first map, we added a point light -this section would try and teach you how to make lights out of brushes known as texture lights, and how to use other Lighting entities.
Environment lighting
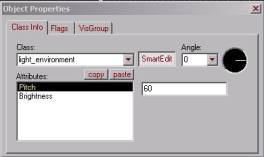
Environment lighting is used most for outdoors lighting, and well then you map must have a “sky”, it’s a brush with all faces covered with texture “sky”. Then the light will not come directly from entity, but from sky. To add Environment lighting to your map, you’ll need to add a point based entity named “LIGHT_ENVIRONMENT” to your map; you can do it same way you added, “ light “ but just select “LIGHT_ENVIRONMENT”
“Pitch” There is not much setting, so it’s pretty simple to use “LIGHT_ENVIRONMENT”. Important is “Pitch”, the angle of light, may have very dramatically results with trying different ## there. And deal with brightness is same, as with point-based light. A negative pitch can add shadows.
Spot lights
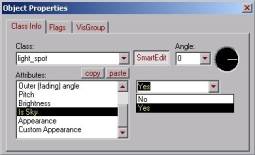
Spotlights are used when you want to make a spotlight. Or if you want to have effect when light is coming in form a window. How to, well add a point based entity “LIGHT_SPOT” to your map, to the place from where you want to light come from, then open LIGHT_SPOT properties.
Target:
Target_1
Inner (bright) angle:
20
Outer (bright) angle:
20
Brightness:
255 255 121 200
Then add a point-based entity “INFO_TARGET” to where you want the light go. And from its properties:
Name:
Target_1
With these options I got effect like in previous pic, you may change them, like colour, angles etc.
Also, you may use spotlight as a environment light, then just you can’t use INFO_TARGET, and you must specify the lights angle with “ pitch “ and “ angle “ options, also you must select “ is sky “ from its properties.
Texture lighting
Texture lights, all right you ask, why should I use a texture light, my point based entity lights are just as good, if not better. Well the truth is, you can use texture lights in any area and they will look good, as long as the light texture is in coordination with the textures around it.
An example could be, dust2 all those long light tubes are in fact texture lights, they set the map in to place, imagine what dust2 would be like, if there was a light reflection on the wall, but no where to show where the light cam from.
Also texture lighting shaves about 50 % off your RAD Compile time, compared to point based lighting.
As I said there is 2 ways to add lighting to your map via point based entities or via textures, although the entity lights can be easily controlled, and support a wide range of effects such as you can turn them on or off at will, make them flicker, etc., it dose not look quit the same nor as good as textured lights. Rooms with lights and no light fixtures in them, such as a dust2 with no long light tubes look pretty crummy, and you also run the risk of an “Entity list too long” error. Trust me stick with texture lighting, it’s easier and cheaper, on both compile times, and map-making times.
Using a texture light
Using a texture light is pretty simple, all you need to do is make a brush or a block, or even cover 1 face of an existing brush with a light emitting texture.
For example try making a solid covered with the texture called ~LIGHT3B on the roof of a room. When you compile your map it should be emitting a yellow glow.
How do I know what texture emits light or not?
How do you know what texture emits light or not? You ask, well this is simple, just open the lights.RAD file found in the World Craft /Valve Hammer Editor folder or where your RAD program is e.g. C:\Program Files\Valve Hammer Editor with a text editor such as notepad, this list the textures that will give off light followed by the colour of the light and finally the brightness e.g.
YELLOW 255 200 100 2000
Thus a texture named yellow, in any wad you use will emit light with a RGB Value of 255 200 100 (yellow), and a brightness of 2000
You can also make any texture you want emit light this way, all you need to do is just add in a new line with the name of the texture you want to emit light, the RGB value the light will give off (it dose not matter about the spacing between the name and the RGB value), and finally the brightness.
An easy way to set the RGB and brightness is to find a texture in the list that has a close match to the propriety’s you want the new listing to have and copy the values across.
Ok, I know now all about texture lights, but -
- My lights textures don’t emit any light
- And my lights.RAD file only has 1 listing or is empty why?
Well that is a very simple fix, first check that the texture is a light emitting texture, normally light emitting textures start with a ~ e.g. ~LIGHT3B
Second go to the folder where your compilers are, e.g. C:\Program Files\Valve Hammer Editor\ and rename the file “valve.RAD” to “lights.RAD”, with out quote marks. When you compile check the process window, at the part where it starts to perform RAD it says using text lights from C:\Program Files\Valve Hammer Editor\lights.RAD or something a long those lines.
Q & A
Q. Do I have to distribute my lights.RAD file with my maps?
A. No. The lights.RAD file is just a file that world craft uses to compile your maps, the game dose not need the file to read the map or for you to play the map.
Q. Why do I have more face lights then I have light textures when I use light textures?
A. A brush normal has 6 faces; each face on a light emitting texture is a classed as a light by RAD.
Q. You said that my RAD compile would be cut in half if I used texture lights, but it’s taking me twice as long. Why?
A. It may be your computer system. Systems that are older, say a P 1 200, with 8 Meg of ram will take a lot longer because world craft /hammer needs to use the windows swap file, but if you use 256 Meg of ram on a newer system, such as an AMD Athlon 800, it will be cut by approximately half compared to point based lighting, due to the swap file not being need to be used as much. Also check the amount of texture lights, and how big the map is, this can make compile times take longer.
![]()